I've been playing around with nail art here and there. I used to do it all the time when I was younger (and I was pretty good at it since I was really good at drawing), but then I stopped doing nails and just lost that magic touch. I'm slowly getting better and better, and finding inspiration everywhere. Here are some of my first nail art tries of many that will come to this blog....
Holographic Leopard
To create this design...
- Apply two coats of Milani 3D Holographic polish in Hi-Res.
- Make random dots of color on the nail using a nail art brush. Color I used: Nicole by OPI in Midnight Snowfall.
- "Hug" the colored dots with black (leave at least one side of the colored dot open) using a nail art brush. Color I used: Sally Hansen (Salon formula) in Black Patent.
- Apply 1 to 2 coats of Seche Vite Quick Dry Top Coat.
- Remember: Allow time for each step of the design to dry before moving on.
Comic Book
To create this design....
- Apply two coats of polish. For the "POW" (pink) nail I used Butter London in Primrose Hill Picnic. For the "BOOM" (yellow) nail I used Sally Hansen (Xtreme Wear) in Mellow Yellow.
- Using a nail art brush or a nail art pen (I used a nail art pen) create the white jagged bubble (the area where you'll put "POW" or "BOOM" or whatever other action word you want). I used Nail Ritz Nail Art Pen in White. You may need several coats to reach the opacity you prefer.
- Using a nail art brush or a nail art pen (I used a nail art pen) outline the jagged bubble. I used Nail Ritz Nail Art Pen in Black.
- Using a nail art brush or nail art pen (I used a nail art pen) write the action word you prefer inside the jagged bubble. I used Nail Ritz Nail Art Pen in Black.
- Using a dotting tool, apply white dots (try to keep them the same size) onto the solid colored areas of the nail (the pink or yellow areas as shown in the photos above). Try to keep the dots in a straight line but alternate the potions as shown in the photos above. I used China Glaze White on White. You could also use the nail art pens, but a dotting tool will easily keep the dots closer to the same size.
- Apply 1 to 2 coats of Seche Vite Quick Dry Top Coat.
- Remember: Allow time for each step of the design to dry before moving on.
Sephora
To create this design...
- Apply two coats of black nail polish. I used Sally Hansen (Salon formula) in Black Patent.
- Using a nail art brush create the Sephora "S" with white polish. I have to admit, this was not easy and required cleanup with black polish after the design was made. It's not easy to get that "S" to be close to the actual logo. You can also use a nail art pen. For the white polish I used Brucci in Snow White.
- Using a nail art brush make white stripes on the tip of the nail. I used Brucci in Snow White. You will also likely need to clean up the stripes with black polish.
- Apply 1 to 2 coats of Seche Vite Quick Dry Top Coat.
- Remember: Allow time for each step of the design to dry before moving on.
ValentineKisses.com (or just Kisses)
To create this design...
- Apply two coats of pink polish. I used Sephora's Chupa.
- Using a nail art brush, paint on the lips using red glitter polis. I used Milani (One Coat Glitter) in Red Sparkle.
- Apply 1 to 2 coats of Seche Vite Quick Dry Top Coat.
- Remember: Allow time for each step of the design to dry before moving on.
Mod Flowers
To create this design...
- Apply two coats of white polish. I used China Glaze in White on White.
- Using a nail art brush, apply the first layer of the flower (the red layer). The flowers should be rounded and non-perfect. You can place the flowers wherever you'd like. I used Essie in Lolipop.
- Using a nail art brush, apply the second layer of the flower (the orange layer). Make an oval shape. I used Butter London in Minger.
- Using a nail art brush, apply the last layer of the flower (the black layer). This should be a smaller oval shape. I used China Glaze in Liquid Leather.
- Apply 1 to 2 coats of Seche Vite Quick Dry Top Coat.
- Remember: Allow time for each step of the design to dry before moving on.
Glitter Peek-A-Boo Kitty
To create this design...
- Apply 1 to 2 coats of gold glitter polish. I used Milani (One Coat Glitter) in Gold Glitz.
- Using a nail art brush, paint a black cat head. This should be the top of the head going down to the nose, applied at the tip of your nail. I used Sally Hansen (Salon formula) in Black Patent.
- Using a dotting tool, apply a minty color for the base of the eyes. I used e.l.f. Cosmetics in Mint Cream.
- Using a smaller dotting tool, apply the gold centers of the eyes (using the same gold color you used as a base). I used Milani (One Coat Glitter) in Gold Glitz.
- Using a nail art brush, apply a pink polish for the nose. I used Sephora in Chupa.
- Apply 1 to 2 coats of Seche Vite Quick Dry Top Coat.
- Remember: Allow time for each step of the design to dry before moving on.
Snowy Branches
To create this design...
- Apply two coats of a very light blue or grey/blue. I used Essie in St. Barths Blue.
- Using a nail art brush, create the tree and branches with a brown shade. I used Sephora n No. 13.
- Using a nail art brush, create the snow on top of the branches using a white shade. I used Brucci in Snow White.
- Using a nail art brush, create glitter on the snow using a clear based sliver glitter. I used China Glaze in Fairy Dust.
- Apply 1 to 2 coats of Seche Vite Quick Dry Top Coat.
- Remember: Allow time for each step of the design to dry before moving on.
And now for some random designs (holiday, related to family, related to my dogs, etc.).
If anyone is really interested in a tutorial (like the ones above) let me know and I'll post the instructions for it.
101 Dalmatians inspired...
Shades used:
- [white] e.l.f. Cosmetics in White
- [black] Sally Hansen (Salon formula) in Black Patent
- [reds] China Glaze in Ruby Deer and Milani (One Coat Glitter) in Red Sparkle
- [golds] China Glaze in Midnight Kiss and Milani (One Coat Glitter) in Gold Glitz
Inspired by my dogs...
My dog Batman
(a chocolate lab with white on his belly and paws)
Shades used:
- [brown] e.l.f. Cosmetics in Chocolate
- [white] Brucci in Snow White
My dog Potter
(a white pit bull with tan spots)
Shades used...
- [white] Brucci in Snow White
- [tan] Brucci in Class Act
Tiger
(my husband's favorite animal)
Shades used...
- [black] Sally Hansen (Salon formula) in Black Patent
- [brown] Brucci in Sandalwood
- [white] Brucci in Snow White
- [pink] Brucci in Luv Olivia
Gummy Bear
(inspired by Willy Wonka & The Chocolate Factory... my son's favorite movie)
Shades used...
- [white] e.l.f. Cosmetics in White
- [red] Essie in Lolipop
Haunted House
(because I love Halloween)
Shades used...
- [black] China Glaze in Liquid Leather
- [grey] Claire's in Rain Drops
- [darker grey] Pure Ice in Kiss Me Here
- [white] China Glaze in White on White
Love Letters
Shades used...
- [red] Wet n Wild (Rock Solid) in Rockin In Rubies
- [white] Brucci in Snow White
- [black] Sally Hansen (Salon formula) in Black Patent
- [pink creme] Sephora in Chupa
- [pink glitter] China Glaze in Mrs. Clause
- [silver] Sally Hansen (Xtreme Wear) in Celeb City
Sparkle Cupcake
Shades used...
- [blue] Sephora by OPI in Havana Dreams
- [glitter frosting] OPI Sparkle-icious
- [glitter candle] Milani (One Coat Glitter) in Red Sparkle
- [glitter flame] Milani (One Coat Glitter) in Gold Glitz
- [lighter green] Sally Hansen (Xtreme Wear) in Green With Envy
- [darker green] China Glaze in Four Leaf Clover
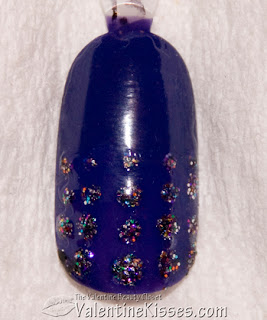
Sparkle Dots
Shades used...
- [purple] Nicole by OPI in Midnight Snowfall
- [sparkle dots] OPI Mad As A Hatter
Hungry Panda
Shades used...
- [light green] Sally Hansen (Xtreme Wear) in Green With Envy
- [white] e.l.f. Cosmetics in White
- [black] Sally Hansen (Salon formula) in Black Patent
- [darker green] China Glaze in Four Leaf Clover
Candy Mints
(Inspired by my son's Christmas wrapping paper)
Shades used...
- [blue] China Glaze in Shower Together
- [white] Brucci in Snow White
- [red] Essie in Lolipop
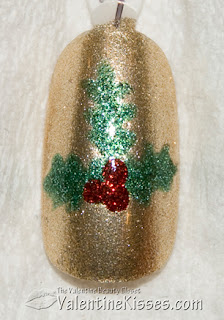
Holly
Shades used...
- [gold] China Glaze in Midnight Kisses
- [green] China Glaze in Mistletoe Kisses
- [red] Milani (One Coat Glitter) in Red Sparkle
Santa Suit
Shades used...
- [red] Essie in Lolipop
- [white] Brucci in Snow White
- [silver] Sally Hansen (Xtreme Wear) in Celeb City
- [black] Sally Hansen (Salon formula) in Black Patent
There will be more nail art photos to come in the future! I just wanted to get these up before I forgot! Enjoy!
UPDATE: Check out these nail art posts:


0 Yorumlar